Double Diamond Hill RanchDouble Diamond Hill RanchDouble Diamond Hill RanchDouble Diamond Hill Ranch
  • About
  • Services
  • Products
  • Events
  • Posts
  • Contact

DIY Concrete Countertops: Forms

    Home My Old House Interior DIY Concrete Countertops: Forms
    NextPrevious

    DIY Concrete Countertops: Forms

    By Tyson Davis | Interior, My Old House | 0 comment | 13 May, 2017 | 0

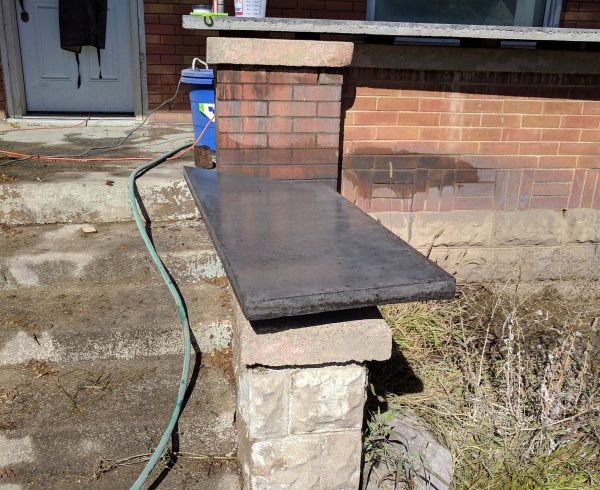
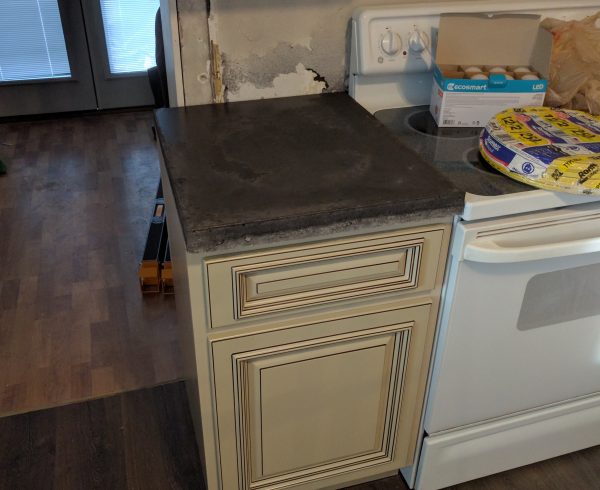
    Here at DDHRanch, we believe in being resourceful so it is no surprise that when it comes to kitchen counters we made our own concrete countertops!

    Here is the list of supplies needed:

    • Melamine 4×8 sheets
    • Thin plywood 4×8 sheet
    • 2-inch styrofoam
    • Miter Saw
    • Glue gun and glue
    • Acetone with a cloth
    • 100% Silicone
    • Paste Wax
    • Corner and Seam Shaper
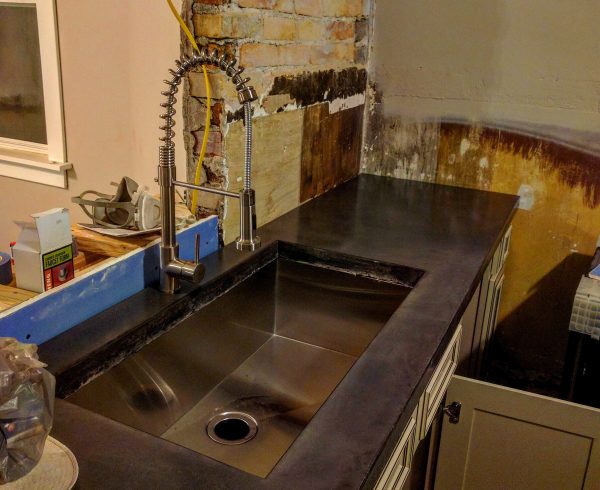
    • Under Mount Sink
    • Kitchen Faucet

    I did a lot of research before deciding that I could actually pull off making my own concrete countertops, in that research, I was lead to a site called Concrete Exchange. This site was a huge resource to me, they have videos and descriptions and walkthroughs for each step. So I will give you a quick overview here of what I did to go from start to finish.

    The first step is to decide if you are going to pour your concrete countertops in place or informs and move them. I decided to pour them into forms and then place them afterward. So I had to make forms and to make sure they were the correct shape/size I used some thin boards to make a template of the counter space, then I flipped them upside down on a sheet of melamine.  the reason for this is because the plastic membrane is waterproof so when you pour the wet concrete in the form it doesn’t soak into the wood. The reason that you flip it upside down is that then you get a really nice smooth surface on the top. DDH Ranch Concrete Countertops

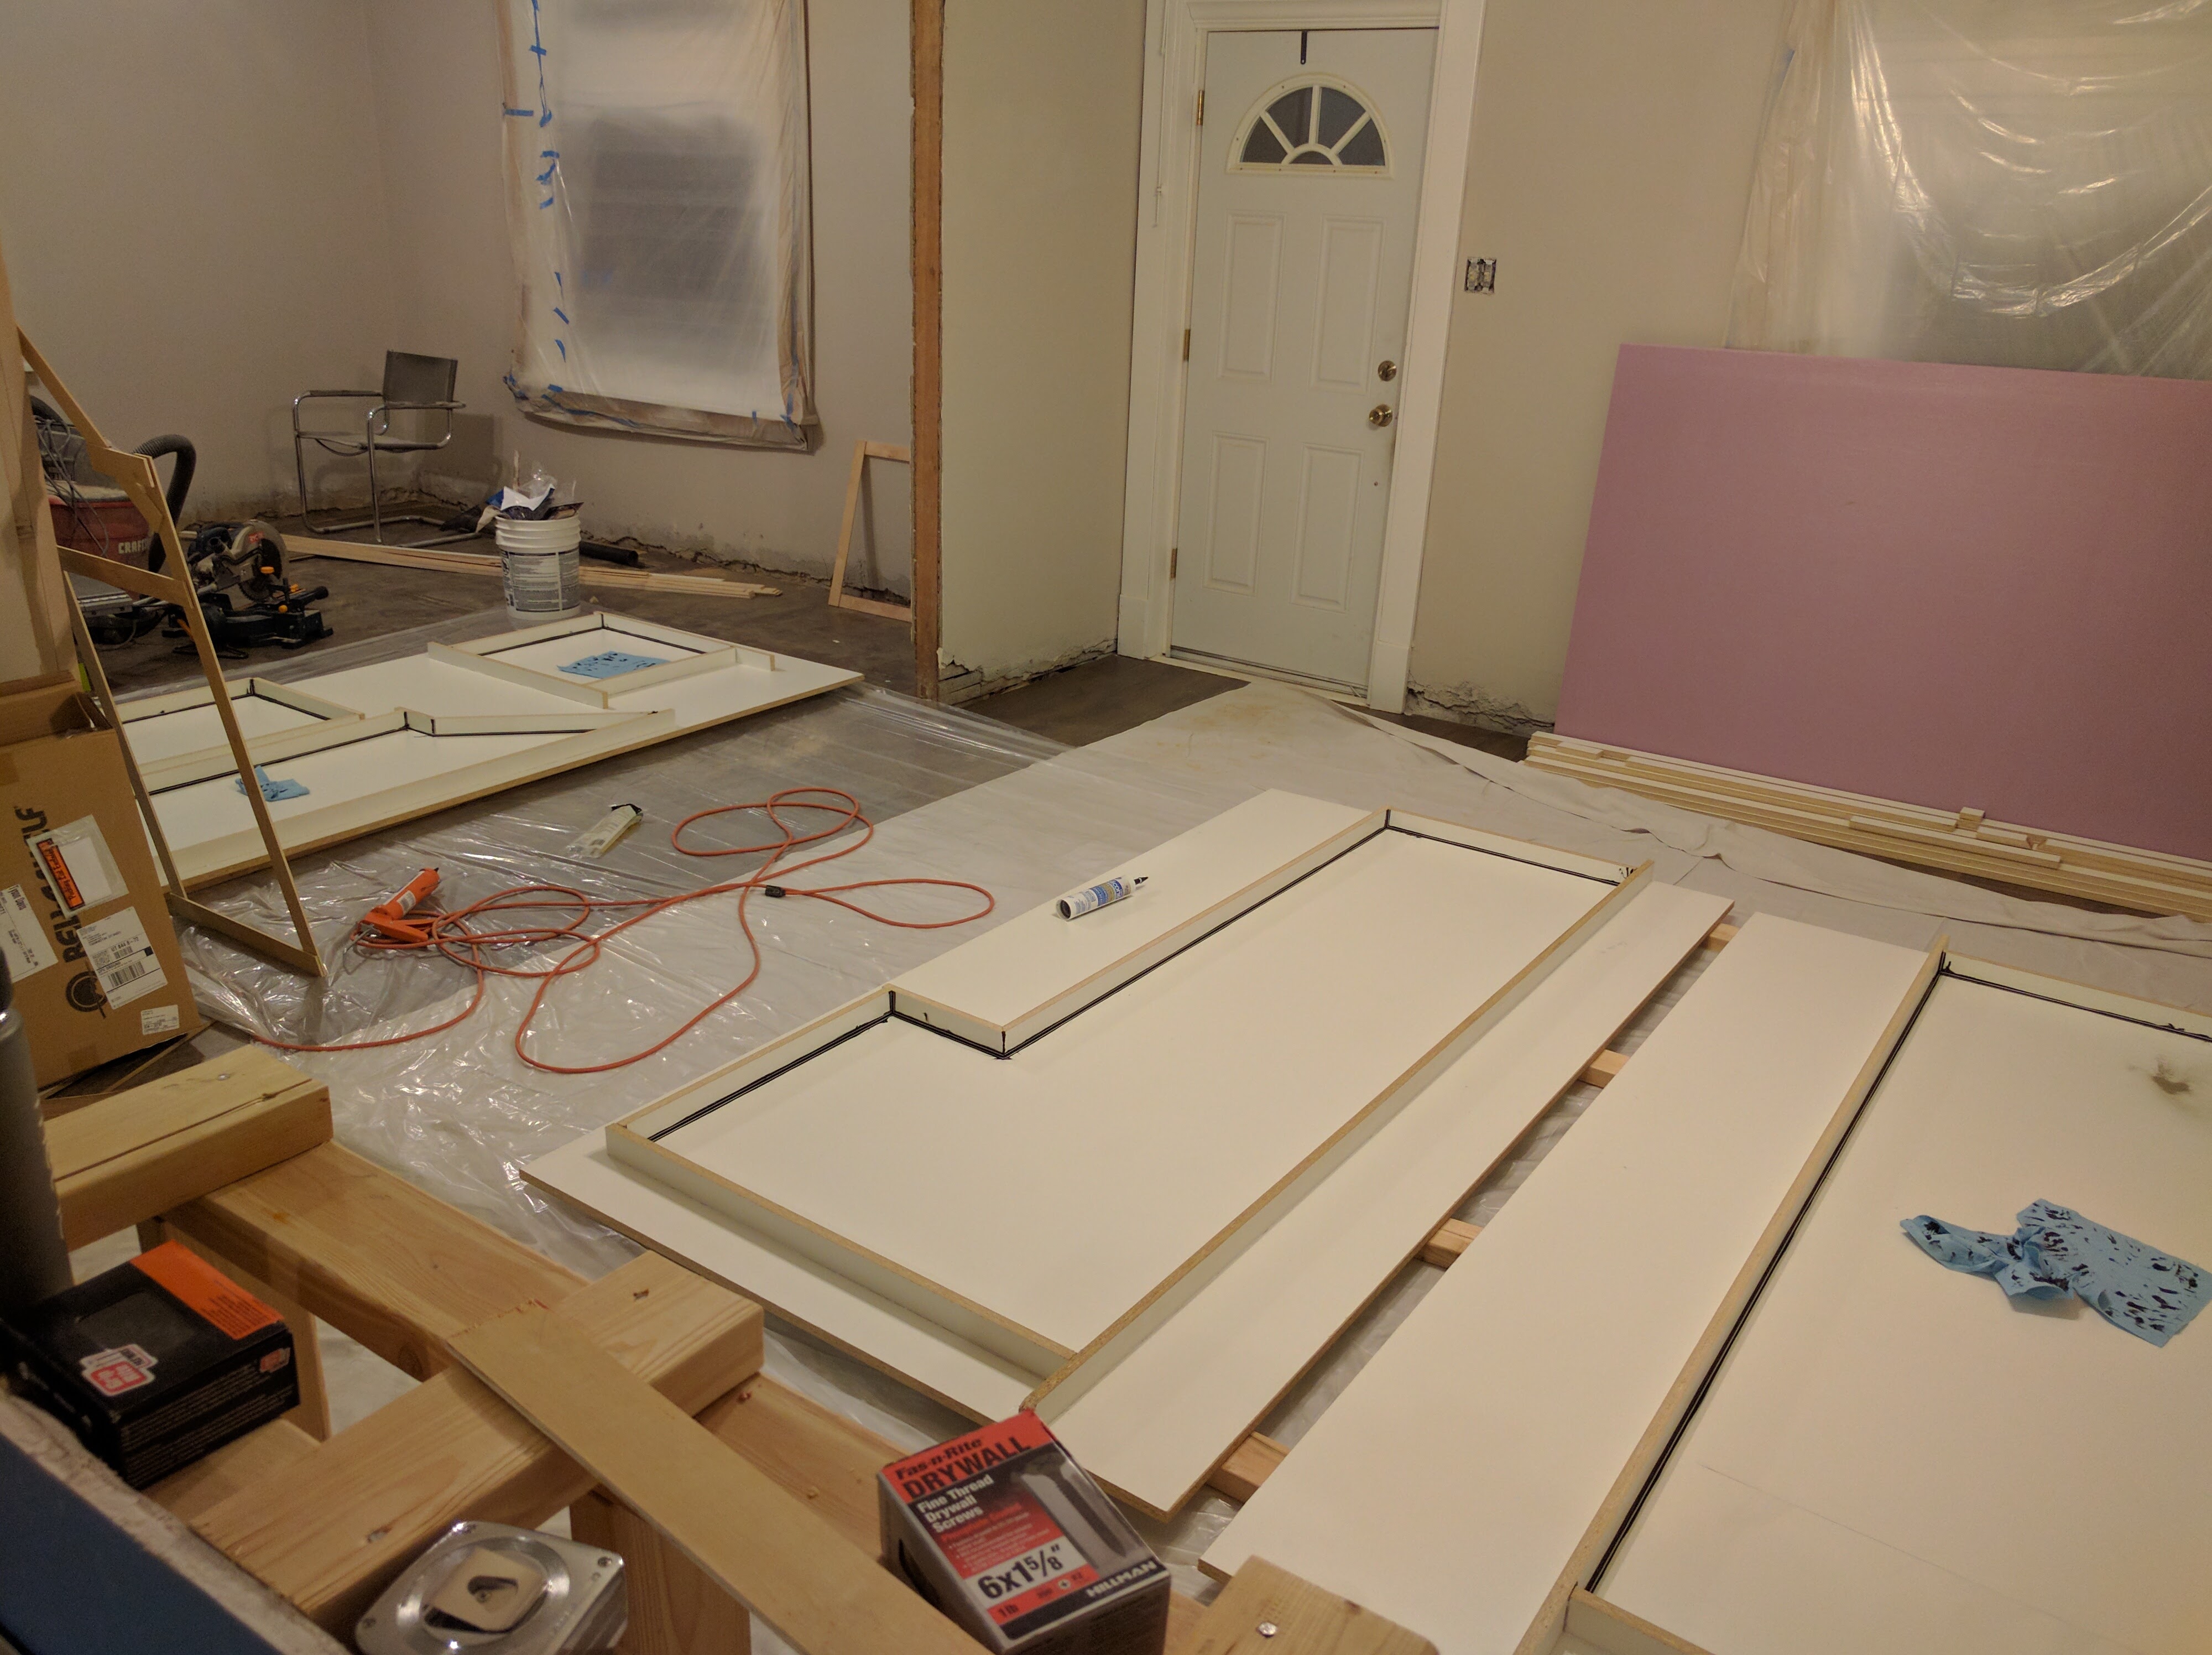
    Then to make the forms you cut melamine into 2-inch strips (I wanted 2 inch thick counters) to make your form walls. These go right up against the templates so that when these are removed your forms are the correct size and shape.

    DDH Ranch Concrete Countertops

    To secure the form walls I used a hot glue gun to seal the whole length on the walls on the outside which held perfectly. (I was nervous about that but it worked amazingly well) The glue gun I used can be found here!

    DDH Ranch Concrete Countertops

    One important note is that with the walls you want to make sure that if you have an inside corner that your use a miter saw to cut it so that the membrane is the only thing that the concrete will touch. (as seen above) If the concrete touches the wood then you will have problems.

    DDH Ranch Concrete Countertops

    As you can see in the pictures above, I did a large pour and had 5 different forms to do at once which is quite a lot.

    DDH Ranch Concrete Countertops

    I had to do this in my dining and living rooms because at my house I don’t have a garage and there isn’t space anywhere else in my house. Plus I was pouring this towards the end of winter and the weather was not predictable so outside was not an option.

    DDH Ranch Concrete Countertops

    After you finish placing the walls, take out the templates. At this point, I cleaned the inside of the forms with acetone that you can get here. Then to seal the inside of the walls and create a round edge I used silicone that you can get here it needs to me 100% silicone and I suggest getting black. Before putting it on I wiped on the walls and base wax to release the excess silicone which I’ll get to in a minute, you can get the wax here. The way I made clean round edges was using these plastic dowels that are cut at an angle, you can buy these here. They helped a ton to move things along and make everything uniform. After using the dowel to create a round edge there is excess silicone that I had to remove which is why I waxed the wall and base.

    DDH Ranch Concrete Countertops

    The last step in making the forms is to add any inserts you may need. For me, I bought a large under mount sink from Amazon which can be found here and the faucet I used is the one you can find here. For both of these pieces, I needed to have a hole in the concrete countertops the exact size of each. The sink came with a template and I cut 2 inch insulation foam to fill the sink space. This then was taped around the edge with packing tape and the sealed to the base with silicone like the walls. Faucets have a couple of different sizes, mine is a 2.5 inch I believe and so that is the form piece that I bought here.

    Once those are in place you have your forms finished and ready to go.

    DDH Ranch Concrete Countertops

    Make sure to read the next step here.

    If you have any questions on anything that I did here or if I missed explaining something please post your question in the comments at the bottom of this page and I will do my best to answer them for you!

    As an Amazon Associate, DDH earns from qualifying purchases

    100 years old, 1915, concrete, counters, countertops, diy, interior, kitchen, my old house, renovation

    Related Post

    • DIY Concrete Countertops: Polishing

      By Tyson Davis | 4 comments

      After getting all the concrete countertops taken out of the forms I had to get some help from a couple friends to get the larger ones moved to where I would polish them. This isRead more

    • DIY Concrete Countertops: Finishing

      By Tyson Davis | 0 comment

      After polishing the concrete countertops they are now ready to be finished. This takes a couple of steps One is to seal the concrete because concrete is porous and the second is to add aRead more

    • DIY Concrete Countertops: Grinding

      By Tyson Davis | 0 comment

      After feeling like having to wait forever for the concrete countertops to cure I was able to smooth out the bottom surface that was exposed since the counters are upside down when in the form.Read more

    • DIY Concrete Countertops: The Mix

      By Tyson Davis | 0 comment

      Here is the next step in making the concrete countertops. DDH Ranch supply list: Water trough or Concrete mixer Bagged Concrete Fiberglass shavings Concrete color Concrete vibrator or Reciprocating saw So after the forms are madeRead more

    • Don’t Use Ikea Kitchen Cabinets

      By Tyson Davis | 0 comment

      Let’s talk about kitchen cabinets! At my 9-5 career I have been a project manager for some time now and one of the projects that I was placed over was managing our building remodel whichRead more

    Leave a Comment

    Cancel reply

    You must be logged in to post a comment.

    NextPrevious

    Recent Posts

    • Life Skills You Should Learn Before Living Rurally
    • How to Get Started Keeping Bees on Your Homestead
    • Essential Tools for Maintaining a Large Homestead Property
    • How to Get the Best Use Out of Your Homestead’s Fireplace
    • Dealing With a Mouthy Puppy on Your Homestead

    Recent Comments

    • nha cai, nha cai uy tin on DIY Concrete Countertops: Polishing
    • link letou on DIY Concrete Countertops: Polishing
    • link letou on DIY Concrete Countertops: Polishing
    • Jefferey Dickson on 7 Common Pests That Can Threaten Crops or Livestock
    • ASH Green on DIY Farmhouse Table

    Archives

    • February 2021
    • September 2020
    • July 2020
    • February 2020
    • December 2019
    • November 2019
    • September 2019
    • August 2019
    • July 2019
    • June 2019
    • May 2019
    • April 2019
    • March 2019
    • February 2019
    • November 2018
    • October 2018
    • September 2018
    • August 2018
    • July 2018
    • February 2018
    • July 2017
    • June 2017
    • May 2017
    • April 2017
    • March 2017
    • February 2017
    • January 2017
    • November 2016

    Categories

    • Books Worth Reading
    • Country Girl
    • Cowboy Poetry
    • DIY
    • Exterior
    • Gifts
    • Homesteading
    • Horse Tack
    • Interior
    • Interior
    • Life Lessons
    • My Old House
    • Reins
    • Saddles
    • Shooting
    • Thoughtful Thursday's
    • Thoughts on Horsemanship
    • Uncategorized

    Meta

    • Log in
    • Entries feed
    • Comments feed
    • WordPress.org
    • About
    • Services
    • Products
    • Events
    • Posts
    • Contact
    Copyright 2021 Double Diamond Hill Ranch | All Rights Reserved
    • About
    • Services
    • Products
    • Events
    • Posts
    • Contact
    Double Diamond Hill Ranch