
Planning A Pole Barn Shed (an introduction)
Hopefully if you are planning on designing and building a pole barn shed yourself this series of posts will help you avoid the same mistakes I made. As a note the planning of each step was an iterative process of designing then redesigning till I got to the final plan.
The first part of building my pole barn shed was planning it out. I did this partly on paper and a whole lot in my head (which I don’t recommend). I decided how big I wanted the pole barn shed to be and where on my lot I wanted to put it, then started to design it. I knew I wanted to have a garage door on the front, a man door on the side, electricity for lights and woodworking tools, and my wife wanted it to have a couple windows and look “cute”. I made a floor plan and then drew some basic plans for the pole barn shed foundation and framing.
I was originally going to build my pole barn shed with a standard 15 inch on center framing pattern when (after drawing up plans) I realized that building a 15′ x 30′ shed with that type of framing was going to cost more than the $3500 I had budgeted (yes I still went over budget). I did some research on building a cheaper shed and came across the pole barn shed construction method. One of the major costs of building a shed was sheeting it with OSB and then covering that with some type of siding. The OSB was around $1 per square foot and the cheapest siding I could find was also around $1 a square foot making the cost of the exterior covering along to be $2 per square foot. Using a pole barn shed construction method is much cheaper because you can use metal roofing for the siding which does not require OSB sheeting and is (from where I bought it – metalmart.biz) about $1 a square foot. That meant I could cut my exterior covering cost in half which made the project more affordable.
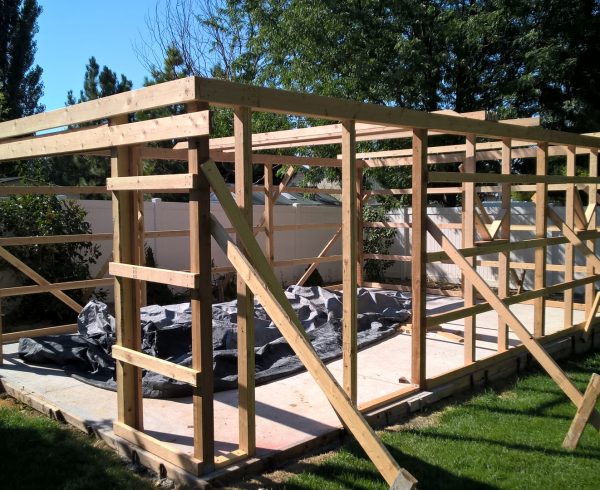
I found that the original plan of making the pole barn shed 15′ x 30′ would mean I would end up with a lot of cutting and wasted lumber. It made more sense to build it 16′ x 24′ because the main posts or poles could be a 2×4 length apart to minimize the amount of cutting I would need to do. I didn’t remember till after construction had started that the most common (and cheapest) length of 2×4 is 92 5/8″ not 8 feet or 96″ so planning to have it 16′ x 24′ wasn’t the optimal size but it worked out (the actual pad size came out being about 15′ 9″ x 24′ anyway because I messed up. Ugh.) On top of all that I didn’t realize that you should plan your pole barn shed around the metal you are going to use as it is much easier to build the frame to fit the metal than it is to fit the metal to the frame (Experience). I bought metal panels that that had a width of 3′ but so it made sense in my head that 24 divided by 3 made exactly 8 which meant it would work perfectly! Wrong. The panels had ridges about every 9 inches that were 3/4″ wide and the ridge on the end of one panel would overlap the next panel which meant instead of getting 6′ of panel I got 5 feet 11 1/4″. If you do the math that means I ended up 5 1/4″ inches short.
Planning A Pole Barn Foundation
In my city I was required to have a permit to build a building over 200 square feet and since my shed was about 380 square feet I checked with the city on the requirements for the pole barn foundation. The only requirements they had were that the footings needed to be down to the frost depth which is about 30 inches in my area. So I planned to have 10 inch diameter footings that went 30 inches deep everywhere there would be a post. These footings would connect directly into the pad itself so I could pour the footings and the pad all at once. Inside the footings I wanted to have some rebar cages to help strengthen the concrete. Those rebar cages would then attach to the re-mesh for the pad.
The layout of the pad and posts looked like this though it isn’t to scale. All post footings were evenly spaced except for at the front of the shed which is where the garage door would be.

This is from the actual plans I submitted. Not very fancy but it got the job done.
This is a side view of the foundation plan for the pole barn shed.
The pole barn shed pad would be 4 inches thick with 2 inches of gravel as a base. In the concrete I planned for steel re-mesh to help strengthen it and prevent cracks which you can buy from Home Depot here – http://www.homedepot.com/p/5-ft-x-150-ft-Steel-Mesh-Roll-05042/206154692
When I was forming out the pad my neighbor who had done concrete work for 20 something years suggested that when I bought the concrete I buy the fiber reinforced concrete which I did. Fiber reinforced concrete has fiberglass strands that get added to the mix which makes the concrete really strong. It was an extra 8 dollars per yard of concrete and I think it was totally worth the extra cost.
To calculate the number of yards needed you use this formula
Yards = (Width (in feet) x Length (in feet) x (depth (in inches)/12))/27
Yards is shortened for cubic yards which is 3 feet by 3 feet by 3 feet so the first part of that formula is finding the cubic feet then dividing it by 27 (the number of cubic feet in a cubic yard).
I calculated I would need about 5 yards of concrete with the pad and posts but once I put the forms up I found that our yard slopes about a foot from the front to the back which meant I needed more concrete. I filled in as much as I could with gravel but had to have extra concrete around the edges to act as a retaining wall for the gravel. I could have potentially leveled out the yard but that seemed like a lot more work. I ended up buying a full truck (10 yards) of concrete and using the extra to add on to our back patio. As a heads up when buying concrete most places charge you for buying less than 10 yards of concrete, generally half the price of a yard of concrete for every yard under 10 yards. So if you buy 9 yards of concrete you are actually paying for 9 1/2 yards. Concrete when I bought it was about $135 per yard and with the fiber reinforcement added in the full truck ended up costing about $1500.
Since the pole barn shed was in a spot where a cement truck would not be able to gain access I had a pump truck come out which cost about $350. The pump truck was super nice because they can put the concrete right where you need it. I think I would do that even if the cement truck could get access to the area just because of how easy it made it.
I wasn’t so lucky with the gravel. I rented a dump trailer and borrowed my buddies truck but we could only get the gravel to the side of the house, not all the way back to the pad. I also needed more than just the one dump trailer of gravel so we had them put it in the back of the truck which meant we had to shovel it out of the back of the truck. After that we had to shovel the gravel into a wheelbarrow then haul it to the pole barn shed pad area. If there was any way you can avoid that when you pour your pad, do it!
That pretty well sums up the planning stage of the pole barn foundation. Hopefully this gets you excited to start planning and building your own pole barn shed! Leave me a comment with any questions. Check out the next part planning the pole barn framing!
I do accept as true with all of the concepts you have offered in your post. They’re really convincing and will definitely work. Still, the posts are very brief for beginners. May you please extend them a little from next time? Thanks for the post.
The foundation….the base and the most important part of a barn and pretty much everything in the world! This was a helpful read for me to decide to have my barn done by the pros! : )