Planning the Pole Barn Framing
Planning the pole barn framing seemed simple but there were several details that had to be planned for everything to come together nicely. Some of the key elements were:
- Getting the posts in the right spot on the concrete
- The metal siding (partly done at the foundation planning stage)
- The garage door, man door and window openings
- The trusses
- Eves or no eves
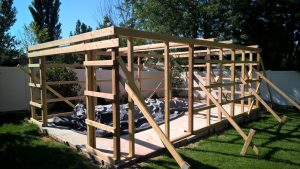
The pole barn framing is as follows, you have vertical posts with horizontal purlins connecting the posts. Here is a picture of essentially what that looks like.


The roof is framed with normal trusses connected again with horizontal purlins. I didn’t have a good truss planning picture of the pole barn framing so here is what it looked like when it was pretty close to done.
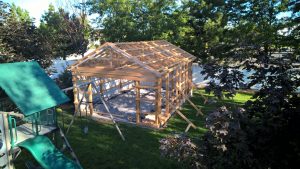
Getting the basic pole barn framing plan wasn’t too difficult for me but if you have questions about it comment below and I’d be happy to answer them.
Getting The Posts In The Right Spot
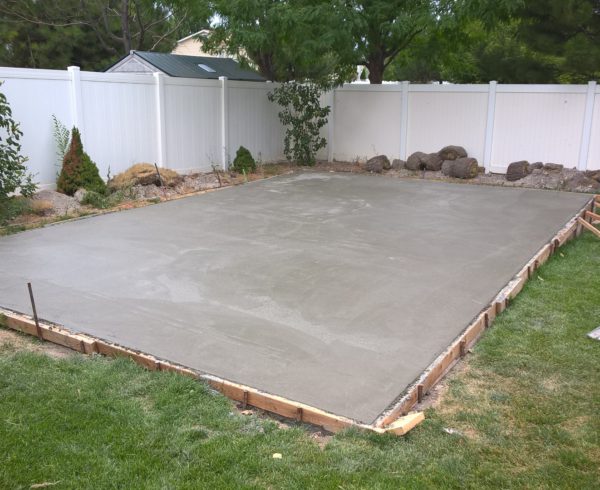
The first challenge I faced in planning the pole barn framing was getting the posts attached to the concrete and placed in the right spot. The posts I planned to buy were 4×4 posts so that is what I originally planned for but found they were only 3 ½ x 3 ½ so be sure to check the actual dimensions of the lumber you are planning to purchase. I believe it is standard for the listed size of the lumber to be off from what the actual dimensions are.
I had planned to use U shaped post ties with concrete anchors to attach the posts to the concrete. The post ties have a hole in them where the concrete anchor goes through allowing me to bolt the post tie to the concrete. After drilling a hole in the bottom center of the post I would seat the post flush with the bottom of the post tie then secure the post with a few nails.
I wanted to have the metal siding overhang the concrete a couple inches so water would not seep under the metal and into the shed. To do that I had to plan exactly where to put the concrete anchors so the face of the purlins would be flush with the edge of the concrete. To get the distance the anchors should be from the edge of the concrete I took half the width of the post (since the anchor would go in the middle of the post) and added the width of a 2×4 (which is 1 ½ inches) which in my case was 3 ¼ inches.
The Metal Siding
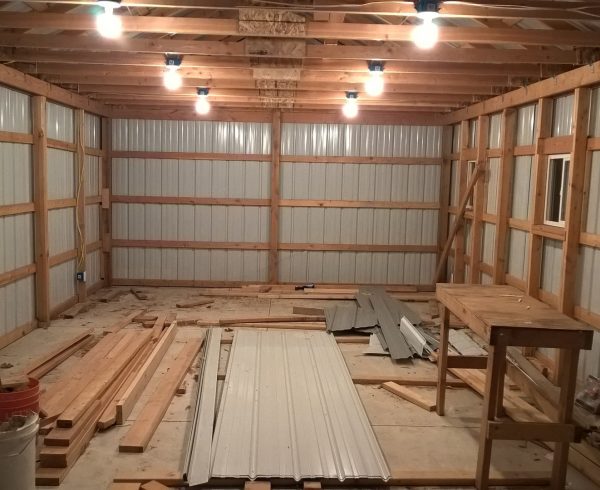
It is important to plan for the metal siding in the foundation stage as well as the pole barn framing stage. The varying metal siding pieces are designed to interface together in a certain way, so if you don’t plan for that it will be difficult to make the metal siding work out (I know from experience). This will vary depending on what type of metal siding you use so I will just go through what I should have done with the metal I used.
The metal I used was 3 feet wide and had ridges every 9 inches. The ridges at either end of the panel would overlap with the next panel. This meant that the total coverage I got from the two panels together was slightly less than 6 feet- and slightly less than 6 feet doesn’t go into 16 feet or 24 feet nicely. The other factor is the corner pieces. The corner pieces have a flap on them which should interface with the ridge of the panel. Since the corner piece has 4 or 5 inches from that flap to the actual corner the ridge of the metal panel it does not need to be right at the corner of the shed, it can be out a couple inches. This same principle goes for the gable trim pieces for the roof so be sure to plan the length of your roof with the metal in mind as well. I will confess this is the part of the shed I did not plan super well. I was impatient and didn’t want to read the manual which shows the measurements of all the pieces and how they go together. Lesson learned, don’t make the same mistake I did. Check out my post on planning the pole barn siding for more info.
The Garage Door, Man Door and Window Openings
You need to know the rough opening dimensions for all doors and windows to plan the pole barn framing. I unfortunately didn’t know what that was for my garage door so the door overlaps the opening a couple inches on either side which isn’t a huge deal but had it been an inch or two more on either side it would have made installing the garage door a big nightmare. I believe most garage door rough openings are just an inch or so less than the width and height of the garage door itself.
For the man door opening the purlins will attach to the frame of the door just as if the two sides of the door were posts. The part I didn’t plan for here is when you don’t have a purlin running directly from post to post it allows the purlins and door frame to swing all over the place. To secure the door frame I cut a 2×4 to fit in between the post and the door frame, laid it flat on the concrete and secured it with a couple concrete nails and a .22 caliber single shot Ramset powder hammer.
The windows I purchased had a rough opening size slightly larger than 2 feet so rather than cut purlins I adjusted the distance between the purlins on that wall to match the rough opening sizes for the windows. I then framed out the window just like you would a normal window. This could be tackled in several different ways but that seemed like the easiest. Just be sure you plan out how the purlins will interface with the rough opening of the window.
The Trusses
I built my own trusses using a common truss construction where you have the king post in the center of a bottom chord and two top chords connecting at the center (king) post. I originally planned on using two 8 foot 2×4’s for the bottom chord but a friend convinced me to spend the extra money to get 16 foot 2×4’s and I am glad I did – not only because it is structurally better but- it made building the trusses easier as well.
To connect the different pieces of the truss I used two pieces of plywood and sandwiched the 2×4’s between them and secured it with screws. This is a cheap way of doing it but if you don’t mind spending a little extra then truss connector plates are faster and easier.
I was required to use hurricane straps to connect my trusses to the walls. I had to use H2 hurricane ties because the plywood sandwiches made the truss to wide for the H1 ties.
Eves Or No Eves
Adding eves makes the shed look nice and I suppose they have some rain shedding benefits but they are a pain. I added them solely because my wife wanted the shed to be cute and I wanted her to be happy with it (which she is).
To add the eve I had the top chord of the truss overhang the edge of the shed. You could have the bottom chord overhang instead if you wanted but that seemed more difficult to me. Since the top chord is at an angle it doesn’t leave a horizontal section for the eve so I cut a bunch of triangle pieces to screw to the bottom of the overhang so there would be some framing that was horizontal I would attach things to. These triangle pieces also acted as a guide for the J channel that the metal for the sides would slide up into and which the metal for the eve would slide above.
I then planned to have drip edge for the top side of the overhang, eve trim for the bottom edge and leftover metal siding for the actual eve. I didn’t plan this part out as well as I should have so it is a miracle that it worked out as well as it did.
If you have any questions about planning the eves or any other part of the pole barn framing leave me a comment!


I’m going to start giving square-dancing lessons in my yard, and I want to have a rustic-looking pole barn constructed there to give that authentic feel. It’s good to know what I should be talking to a contractor about (I don’t plan to build it all myself) and I’ll make sure to take your advice and plan for the metal siding pieces to interface together as they’re meant to. Your experience building a pole barn was very helpful for me to read through, and now I know I’ll be a lot more knowledgeable when discussing materials and dimensions with the contractor.
Hey Rhianna, that sounds awesome! I am glad my post could be of some help to you. Good luck on the project and square dancing lessons 🙂